Aespa Ningning: Tactical Headgear
- Client
- Myself
- Service
- 3D Modelling
- Duration
- 12 Weeks
- Blender
- +2
Creating a Printable 3D Model From a Promo-Only Reference
The Problem
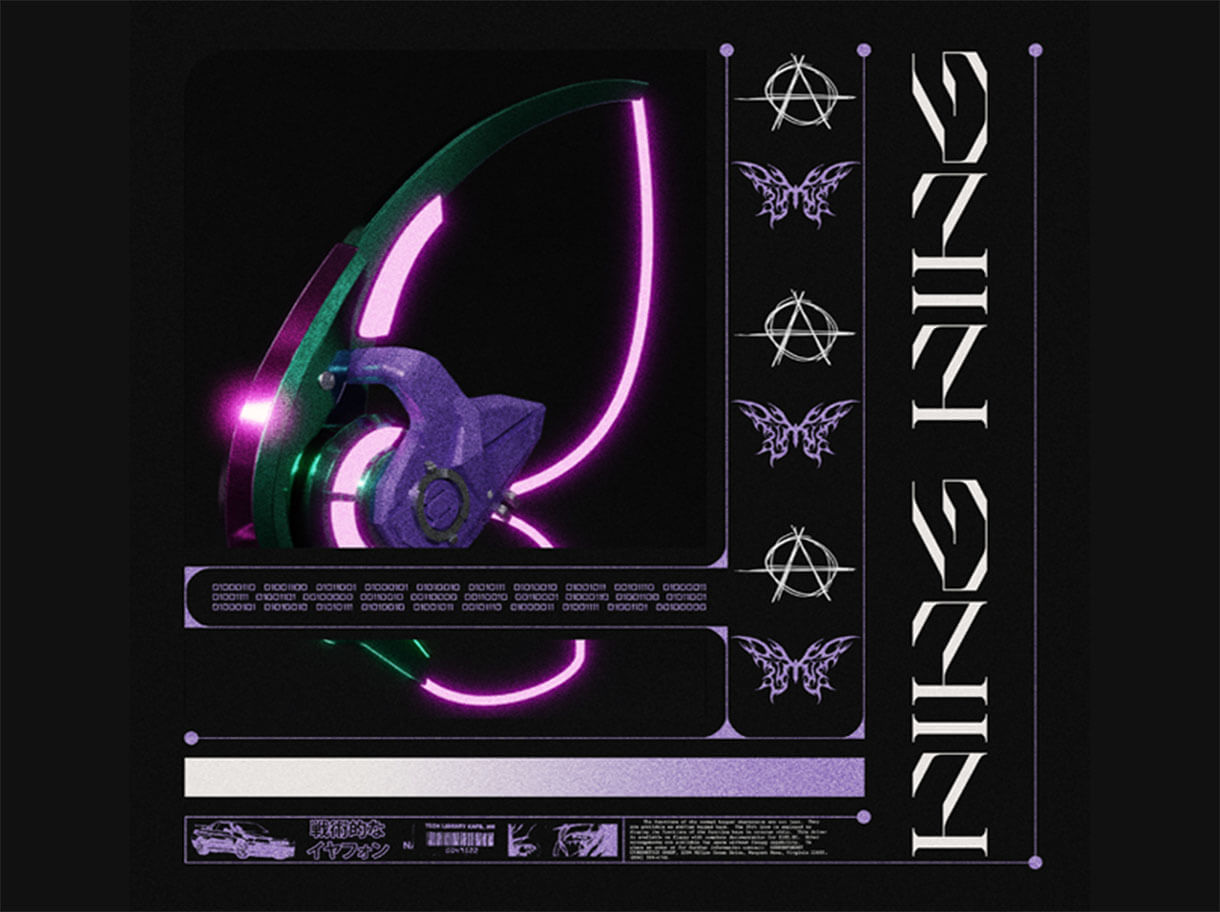
Aespa Ningning has a distinctive “tactical headgear/headphone” look tied to her ED Hacker concept—an accessory that’s visually recognizable but not readily available as a downloadable model or production-ready 3D asset. The challenge was that I wanted a version I could reuse for future projects, specifically something suitable for practical applications like 3D printing, prop creation, or further 3D scenes.
The main limitation was reference quality and availability. Instead of having official model files or precise dimensions, I only had promotional images to work from. That meant the project required careful observation and reconstruction: translating a 2D marketing visual into a believable 3D form with accurate proportions, recognizable details, and a clean shape that could hold up when viewed from multiple angles.
Another key concern was usability. A model can look good in a single render but still fail as an asset if the geometry is messy, the shapes don’t align, or the form isn’t consistent enough for real-world output (like printing). The goal wasn’t just “make something similar”—it was to recreate the headgear in a way that feels faithful and functional as a reusable 3D asset.
Finally, the concept context matters. The “E.d.” meaning is part of the identity behind the design: E.d. = EXIF Detective, the hacker group to which Ningning belongs. This terminology is referenced from Epic Seven. Including that context helps explain why the headgear is presented as tactical and tech-forward rather than purely fashion-focused.
The core problem was how to build a high-quality 3D model of Ningning’s tactical headgear using only promotional references, while keeping it accurate enough for future reuse—especially 3D printing.
Recreated the Headgear in Blender Using Image-Based Modeling
The Implementation
I recreated the headgear as a 3D model in Blender by studying the promotional ad images and rebuilding the shapes piece by piece. Because the reference was primarily 2D, my workflow focused on proportion matching and iterative refinement—blocking out the major forms first, then progressively adding the details that make the design recognizable.
Key actions I took included:
- Collected and reviewed promotional reference images to identify the key design features and silhouette
- Blocked out the main forms in Blender to match the proportions and overall profile of the headgear
- Refined the model through iterative adjustments so the shape remains consistent when viewed from different angles
- Modeled the distinctive “tactical/headphone” elements that define the E.d. Hacker look
- Cleaned and optimized geometry to keep the asset usable for future workflows (rendering, modifications, and potential printing)
- Validated likeness by comparing renders/screenshots against the original promotional reference
Throughout the process, I prioritized recognizability and practical reuse. The goal was to create an asset that isn’t locked to one camera angle, but instead works as a true 3D object—something I can scale, adjust, and export depending on future needs.
A Near-Perfect Replica Ready for 3D Printing
The Results
The final output was a 3D model that almost perfectly replicated the tactical headgear shown in the promotional material. The silhouette, major shapes, and defining details were recreated closely enough that the asset reads immediately as “Ningning’s ED Hacker headgear” rather than a generic headset.
More importantly, the model was built with reuse in mind. Since the intention includes future applications such as 3D printing, the recreation focused on clean structure and consistent forms—making it easier to refine further for print tolerances, part separation, or additional detailing if needed later.
Overall, this project demonstrates how I can translate limited 2D references into a functional 3D asset—balancing visual accuracy with practical output requirements.